The Best Ultimate Sandbag Training Exercise for Core Strength
2018-05-12

A big part of using DVRT Ultimate Sandbag Training is utilize the right the tool, for right purpose. While most people think DVRT is just a way we back door Ultimate Sandbag Training, that isn’t the case at all. It’s important to know this purpose or simply you will never get a true feeling of the power of the drills that we believe so strongly in performing.
If there’s never a WHY, you’ll never know WHAT to do. Let’s face it, with the every growing and influential world of social media this can be a HUGE problem in people realizing what is best for their fitness goals.
A good example to explain this is Ultimate Sandbag Training dragging. This one move has become a social media epidemic of absolute confusion and lack of knowledge of what the purpose is for the drag. I love what Josh Henkin said in a recent post he made regarding this exact issue:
“A smaller implement creates way less friction. Here is an example of our smallest Ultimate Sandbag compared to equivalent kettlebell. You see the Ultimate Sandbag is almost THREE times the length creating far more friction. Just as we say the best tool for swings are kettlebells, Ultimate Sandbags are far better for drags. Knowing when to use the RIGHT tool in the toolbox is key in being a master craftsmen/woman!”

Take a look of the video below to see what is commonly done incorrectly and how it CAN be done right:
LEFT SIDE: Going to fast with no control. Physical Therapist, Gray Cook states “speed hides dysfunction.” So performing a lateral drag at this pace will only lead to injury because there’s zero emphasis on stabilizing the major muscle groups. More reps is NOT the answer.
The beauty of Ultimate Sandbag Training drags like these is how time under tension exposes our weaknesses and needs. It isn’t just a matter of moving the weight from side to side, but how the tension and friction causes such a unique stress to our body.

RIGHT SIDE: Right idea, but wrong tool…for SO MANY reasons. First, the kettlebell has no ability to dragged because it’s cast iron — which means it won’t like friction on the ground. Secondly it’s too small to drag because of it’s diameter size (it’s a kettleBELL). Not only is the Ultimate Sandbag the better choice because it has a long and smooth shape suited for lateral drags; it has handles outside the USB (versus with a kettlebell handle being constantly switched left to right, around, and back).
Most people miss many of the subtitles that make these Ultimate Sandbag Training drills so powerful. After all, after my post HERE on using DVRT for kettlebells you should understand we aren’t trying to force you to use Ultimate Sandbags. We are trying to educate you on why the right tools really do matter!
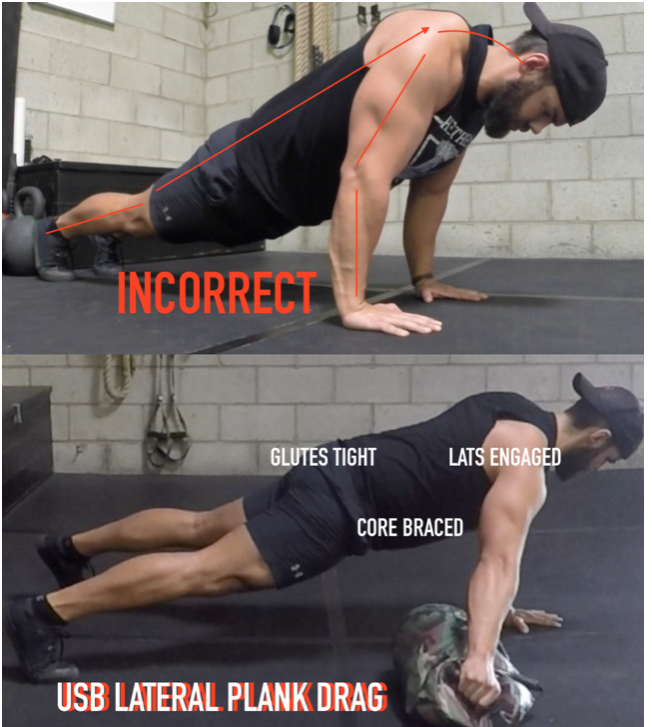
MIDDLE: Strong, stable, and resisting rotation in the plank position as the Ultimate Sandbag laterally drags with control. Shoulders and hips are stacked square over each other as the USB drags left to right. This is done by rooting the toes to the ground (shoulder width apart) to gain stability for the glutes and quads to engage and lock in the hips into a neutral plane. The hands at the same time will corkscrew into the ground (like you’re opening two pickle jars) to engage the lats to retract the shoulders down and back. Once everything engages from toes to fingers, the core works in a braced position to connect the body as ONE piece. That idea of connecting the body is one of the best aspects of DVRT Ultimate Sandbag Training.
So as you can see, there’s a lot going on in such a simple movement to gain stability in the right places. It is why no more than 3-5 drags per side should be performed for the lateral drag (especially for beginners). If you want to make it more challenging, simply do it SLOWER. As I’ve constantly stated in my previous DVRT articles…more reps, does’t mean more strength or bring more value to the workout. It more so weakens it, by putting the emphasis on reps and not proper form.

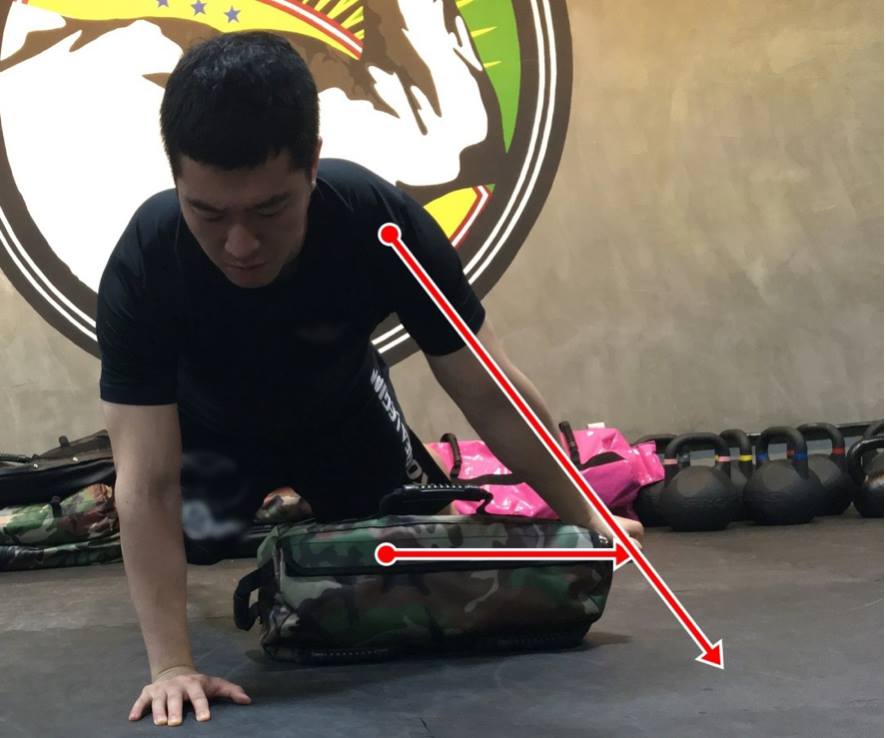
Now that we have a understanding of the purpose to the lateral drag; that it requires anti-rotation in a solid plank position…how can we add rotation to this in a proper manner (unlike the lazy drag)? We now drag the USB up vertically near the torso with that same strong and stable control ending up in a side plank position. Notice in the demo below, my end range STILL matches the original lateral plank drag and as always the same standards apply corkscrewing the hands into the ground to attain the lat to glute connection for better core engagement in the side plank position.
Lastly, we don’t have to stay lateral with dragging the Ultimate Sandbag. The USB Beast Plank Vertical Drags is a good example of this and relates a lot to the classic DVRT Restoration exercise, the USB Bird Dog. The major difference is now the knees now hover over the ground; depending on the big toes to root to the ground for more stability. While the hands are still corkscrewing into the ground, you’ll find this simple change in direction is going to be challenging reaching. Drag the USB vertically up and back down with the same hand and alternate to the next side.
As you can see, there’s much better ways to train the core by simply moving with purpose and not focused on hundreds of pointless reps. These USB drags ARE challenging to maintain solid form — so be sure to perform minimal reps with MAXIMAL effort to get the strength you want. If you’d to see more DVRT Ultimate Sandbag exercise variations like these be sure check my new program DVRT for Real World Strength & Muscle Volume 2:
Find out more how to build real world muscle and strength with Ian’s NEW program HERE for 25% off with coupon code “spring2018” HERE
© 2026 Ultimate Sandbag Training. Site by Jennifer Web Design.


